Butter Cream Icing Recipe: Mary Berry Pro Tips
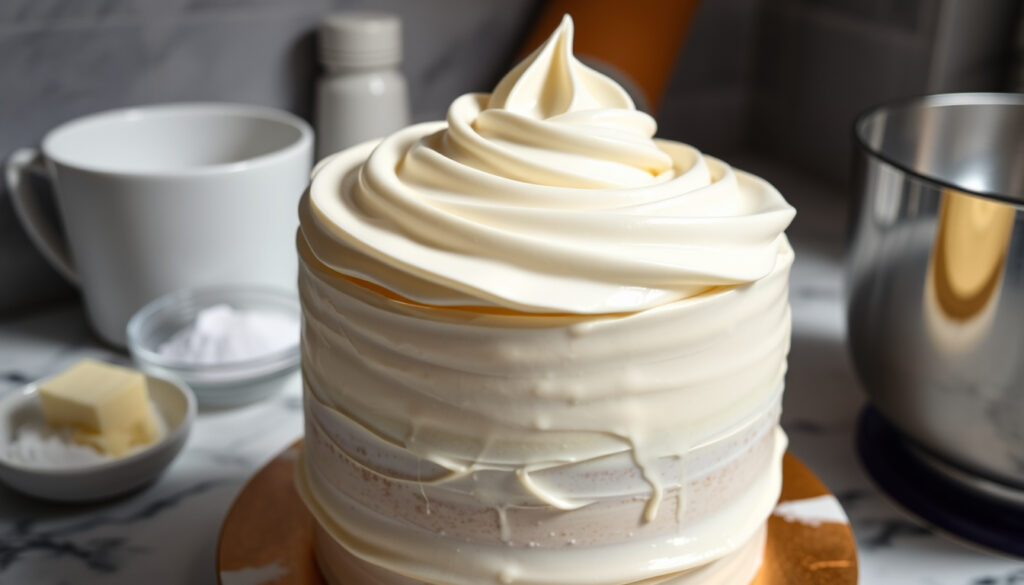
Few baking moments feel as satisfying as piping a perfect rosette—until the buttercream slumps, weeps, or refuses to hold its shape. Whether you’re frosting a birthday cake or decorating cupcakes for a market stall, the difference between a silky swirl and a grainy mess usually comes down to a handful of technique details most recipes skip. This guide walks you through a classic butter cream icing recipe with pro tips borrowed from Mary Berry’s tested method, plus clear-eyed advice on avoiding the pitfalls that catch even experienced home bakers.
Prep Time: 10 minutes · Yield: 3 cups · Key Ingredients: butter, icing sugar, vanilla · Difficulty: Easy · Best For: cakes, cupcakes
Quick snapshot
- Butter at 65-68°F (18-20°C) yields smooth texture (British Recipes)
- Gradual sugar addition prevents lumps and seizing (British Recipes)
- Optimal brand of erythritol for diabetic buttercream
- Exact humidity thresholds for stability issues
- Refrigerated buttercream keeps 1 week, tastes freshest within 3 days (British Recipes)
- Master the five core techniques, then explore European buttercream variants
These specifications summarize Mary Berry’s classic buttercream method and serve as the reference standard throughout this guide.
| Attribute | Detail |
|---|---|
| Primary Ingredient | Softened butter |
| Sugar Type | Icing sugar |
| Standard Ratio | 1:2 butter to sugar |
| Storage | Fridge 1 week |
| Butter Temperature | 65-68°F (18-20°C) |
| Mary Berry’s Butter | 226g (1 cup) |
| Mary Berry’s Icing Sugar | 440g (3.5 cups) |
How to make the best butter cream icing?
Making buttercream that pipes cleanly and tastes buttery rather than gritty comes down to five non-negotiable steps. According to British Recipes (tested baking technique source), Mary Berry’s approach treats buttercream as a proper emulsion—not just sugar stirred into fat.
Ingredients for classic buttercream
- 1 cup (226g) unsalted butter, softened to 65-68°F (18-20°C)
- 3.5 cups (440g) confectioners’ sugar, sifted
- 2-3 tablespoons whole milk, room temperature
- 1 teaspoon vanilla extract
- Pinch of fine salt
Sifting icing sugar is essential to avoid lumps that can clog piping tips, and unsalted butter allows bakers to control the salt level in the final icing (British Recipes). Skip this step and you’ll spend time fishing specks out of your decorator bag.
Step-by-step mixing instructions
- Cream butter in a stand mixer with a paddle attachment on medium speed for 3-4 minutes until pale, creamy, and fluffy (British Recipes).
- Add sifted icing sugar gradually—about 1/2 cup at a time—on low speed to prevent a powdered-sugar cloud and uneven mixing.
- Scrape the bowl halfway through adding sugar and again after all sugar is incorporated.
- Beat on medium speed for a full 2 minutes to aerate and dissolve sugar crystals.
- Combine room-temperature milk, vanilla, and salt in a separate bowl, then add to the mixture.
- Whip at medium-high speed for 3-4 minutes until light, smooth, and voluminous.
Finished buttercream should hold a firm peak that curls over slightly when the paddle is lifted (British Recipes). If it’s too stiff, add milk 1 teaspoon at a time; if too soft, add sifted icing sugar 1 tablespoon at a time.
A paddle attachment beats a whisk every time—it incorporates air while keeping the dense, pipeable structure that decorators need. Whipped buttercream looks fluffier in the bowl but collapses under a piping tip.
What is the secret to good buttercream frosting?
The single biggest factor in achieving silky buttercream is temperature—not just of the butter, but of everything that touches it. British Recipes notes that room temperature (around 20°C / 68°F) for both butter and milk is what separates cloud-like frosting from heavy, grainy paste.
Temperature matters
Cold milk can cause butter to seize, creating a lumpy, grainy texture that no amount of whipping will fix (British Recipes). Take milk out 30 minutes before you start. If your kitchen runs warm and the icing softens during whipping, chill the bowl for 10 minutes then re-whip—this simple step rescues buttercream that would otherwise slump off the cake.
Ratio of butter to sugar
Mary Berry’s classic ratio uses 1 cup butter to 3.5 cups icing sugar, yielding approximately 3 cups of finished frosting. This 1:2 butter-to-sugar ratio produces a frosting that spreads smoothly yet holds peaks for piping. European-style buttercreams use far less sugar—Italian, Swiss, and French varieties rely on granulated sugar cooked to syrup stages, making them less sweet but significantly more technical (Cupcake Project).
If you need more body for stiff peaks, add heavy cream instead of milk—a tablespoon at a time—to boost richness without thinning the texture. Heavy cream for smoothness is particularly useful when making buttercream in humid conditions.
Room-temperature ingredients don’t just improve texture—they prevent the most common structural failure: the butter seizing when cold liquid hits it. Once that emulsion breaks, reincorporating takes time most home bakers don’t budget for.
What common buttercream mistakes should I avoid?
Three mistakes account for the vast majority of buttercream failures in home kitchens. Cupcake Project (baking technique resource) and The Vanilla Valley (specialist cake decorating blog) both point to the same culprits.
Overbeating issues
Overbeating after adding liquid causes buttercream to become flat and dense instead of light and fluffy. Once all ingredients are incorporated, stop mixing and move straight to using or storing the buttercream. A quick 60-second re-whip in the mixer restores lightness if the buttercream sits for more than 30 minutes, but constant agitation breaks down the air structure you worked to build.
Lumpy texture fixes
Cold butter produces lumpy icing that won’t whip up light (British Recipes). The fix is straightforward: let the butter sit at room temperature for 1-2 hours before creaming. If you’ve already made lumpy buttercream, you can rescue it by placing the bowl over a warm water bath (not direct heat) and stirring gently until small soft chunks remain, then re-creaming from scratch once the temperature stabilizes.
Direct heat should be avoided when warming buttercream; gentle ambient warming preserves the emulsion structure while aggressive heat melts the butterfat and ruins the texture (British Recipes).
French buttercream—rich and custard-based—should not be piped as it will melt at room temperature and cause frustration during decorating. This is the richest and tastiest of the three meringue buttercreams but the least stable for warm environments (Cupcake Project).
The implication: Timing your mixing stops matters more than most recipes admit—overworking collapses the air structure you’ve built, leaving you with dense, lifeless frosting.
How to make buttercream for diabetics?
Standard buttercream’s first ingredient is sugar—which makes it off-limits for diabetic bakers unless you swap the sweetener. The challenge isn’t just reducing sugar; it’s maintaining the creaminess and structure that make buttercream worth making. Several alternatives exist, each with trade-offs worth understanding before you start.
Sugar substitutes
Erythritol and stevia are the most viable options for diabetic-friendly buttercream. Erythritol has a clean sweetness without the bitter aftertaste some sugar alcohols carry, and it dissolves adequately when sifted with other dry ingredients. Stevia provides intense sweetness—you’ll need far less per batch, but measuring requires precision to avoid an overpowering taste.
A combination of erythritol and a small amount of stevia often produces the most balanced result, mimicking the sweetness of traditional buttercream without the blood sugar impact. Be aware that sugar-free buttercream may soften faster in warm conditions because erythritol behaves differently than sucrose at higher temperatures.
Low-carb options
Almond flour or coconut flour substituted for part of the icing sugar can add body and reduce the carb count further, though this changes the flavor profile noticeably. These flours also absorb liquid differently, so you may need to adjust the milk or cream quantity to maintain spreadable consistency.
For a true low-carb version, focus on using unsalted grass-fed butter (higher fat content supports structure) combined with sifted erythritol and a touch of vanilla. Whip aggressively and use immediately, as sugar-free versions tend to separate faster than traditional recipes when stored.
Erythritol can crystallize if the buttercream sits too long, creating a gritty texture that appears after 12-24 hours. For diabetic-friendly occasions, make buttercream the same day rather than ahead, or test your specific brand’s behavior before committing to a large batch.
How to make Mary Berry buttercream frosting?
Mary Berry’s buttercream recipe represents the gold standard for classic American-style buttercream—simple enough for beginners but precise enough that small changes produce measurable differences. The Spirited Puddle Jumper (baking technique blog) and British Recipes both document her tested approach.
Mary Berry’s ratios
- 1 cup (226g) unsalted butter, softened to 65-68°F (18-20°C)
- 3.5 cups (440g) confectioners’ sugar, sifted
- 2-3 tablespoons whole milk, room temperature
- 1 teaspoon vanilla extract
- Pinch of fine salt
The ratio of 226g butter to 440g icing sugar produces approximately a 1:2 ratio—slightly less sugar than some American recipes that call for a full 4-5 cups. This makes Mary Berry’s version less cloying while maintaining excellent pipeability. Her four core ingredients are unsalted butter, icing sugar, milk, and vanilla extract (The Spirited Puddle Jumper).
Flavor variations
Mary Berry’s base accepts flavor additions readily. Replace vanilla with lemon zest and juice for a bright citrus buttercream, or add cocoa powder (1-3 tablespoons depending on desired intensity) for chocolate variation. Coffee buttercream works by dissolving 1-2 tablespoons of instant espresso in the milk before adding.
For pink buttercream, use gel food coloring rather than liquid—liquid dyes thin the consistency unacceptably. Add coloring incrementally with a toothpick, whipping briefly between additions to distribute evenly without overmixing.
The difference between buttercream types
Beyond the classic American buttercream that Mary Berry uses, at least eight recognized types of buttercream exist—each with distinct characteristics, skill requirements, and ideal uses. Pastry Living (baking reference site) documents the full spectrum.
- American buttercream: Butter + powdered sugar + liquid. Sweet, stable, easy to make. Not ideal for very warm environments.
- Italian meringue buttercream: Hot sugar syrup poured into whipped egg whites, then butter incorporated. The most stable type—Italian meringue buttercream is ideal for intricate designs and warmer climates (The Vanilla Valley). Requires a candy thermometer and syrup to 240°F.
- Swiss meringue buttercream: Egg whites heated to 160°F over a double boiler, then whipped with sugar. Less sweet than American, silkier texture.
- French buttercream: Egg yolks rather than egg whites, cooked similarly to pastry cream. Richest flavor, least stable—do not pipe (Cupcake Project).
- German buttercream (Creme Mousseline): Custard-based, less sweet than American, easier than meringue varieties.
European buttercreams use granulated sugar and much less sugar overall compared to American buttercream, making them less sweet but significantly more technically demanding (Cupcake Project).
“There are at least 8 recognized types of buttercream: American, Italian, Swiss, French, German, Russian, English, and Ermine—each designed for different purposes, skill levels, and serving conditions.”
— Pastry Living (baking reference site)
Storage and make-ahead tips
Buttercream stores well with the right technique. Press plastic wrap directly onto the surface of stored buttercream to prevent skin formation—a crusty top layer that ruins spreadability and introduces lumps when re-whipped (British Recipes).
Refrigerated buttercream keeps for approximately one week. It tastes freshest within the first 3 days; after that, the butter absorbs subtle odors from the fridge. For longer storage, buttercream freezes well for up to 3 months—thaw overnight in the refrigerator, then rest at room temperature for 60-90 minutes before re-whipping.
When transporting buttercream-topped cakes, chill the cake for 30 minutes between each frosting layer, then refrigerate the finished cake for at least 1 hour before moving. This gives the buttercream time to firm and reduces the risk of sliding decorations.
Expert perspectives on buttercream technique
Professional bakers consistently return to a handful of non-negotiable principles. Sugarologie (decorating technique resource) tested multiple buttercream types for stability and found that Italian meringue buttercream performed best in heat and humidity, while Baking Sense documents German buttercream as less sweet and easier to make than American versions.
The most technically challenging aspect of buttercream making isn’t the mixing—it’s knowing when to stop. Most home bakers continue whipping past the point where the structure breaks down, resulting in frosting that looks airy but collapses immediately under weight. Watch for the moment buttercream pulls away from the bowl sides cleanly and holds a peak that droops just slightly at the tip.
“Room temperature (around 20°C / 68°F) for both butter and milk is the single biggest factor in achieving silky emulsion. Everything else is adjustment.”
— British Recipes (tested baking technique source)
For bakers working in hot kitchens, the solution isn’t less mixing—it’s strategic chilling. If buttercream softens during extended piping sessions, place the decorator bag in the refrigerator for 10-15 minutes to firm without breaking the emulsion. Re-whip for 60 seconds before resuming.
Related reading: Easy Healthy Dinner Ideas · Recette Porc Effiloché Mijoteuse
Mary Berry’s pro tips for smooth piping find strong allies in the secrets for perfect results that tackle grainy textures and soupy disasters head-on.
Frequently asked questions
How long does butter cream icing last?
Refrigerated buttercream lasts about one week in an airtight container with plastic wrap pressed directly on the surface. Frozen, it keeps for up to 3 months. For best quality, use within 3 days of refrigerating.
Can I make buttercream ahead?
Yes. Buttercream can be made up to a week ahead and stored refrigerated, or up to 3 months ahead frozen. Press plastic wrap onto the surface before sealing the container. Thaw refrigerated buttercream overnight, then rest at room temperature for 60-90 minutes and re-whip briefly before using.
How to fix runny buttercream?
Runny buttercream typically results from butter that’s too warm or too much liquid. Add sifted icing sugar 1 tablespoon at a time, whipping between additions, until the consistency firms up. If the butter itself is too soft, chill the mixing bowl for 10-15 minutes then re-whip.
What milk to use in buttercream?
Whole milk produces the richest buttercream and the most stable emulsion. Buttermilk thins the texture but adds tang; heavy cream thickens it. Whatever you use, bring it to room temperature before adding—cold milk causes butter to seize.
Is buttercream freezer safe?
Yes. Freeze buttercream in an airtight container with plastic wrap pressed onto the surface. Thaw overnight in the refrigerator, then rest at room temperature for 60-90 minutes before re-whipping to restore lightness.
How to color buttercream?
Use gel food coloring rather than liquid dyes—gel concentrates provide intense color without thinning the consistency. Add coloring with a toothpick, mixing briefly between additions. For large batches, dissolve gel in a small amount of vanilla extract first for more even distribution.
Buttercream vs whipped cream—which is better?
Buttercream holds peaks and shapes for days at room temperature; whipped cream is lighter but collapses within hours. Buttercream is the practical choice for decorated cakes and anything being transported. Whipped cream suits lighter applications like pie toppings or mousse-filled pastries where richness matters more than structure.
For home bakers, the buttercream choice is clear: master the classic American style first with Mary Berry’s tested ratio, then branch into European variants once you’re comfortable reading your butter’s temperature and your mixer’s rhythm. Bakers who invest time in the foundational technique unlock every variation with confidence.
More related posts
 Best Filter for Water Sink: Under-Sink Reviews Ireland
 117 USD to CAD – Current Rate and Conversion Guide
 Heart Emoji Copy and Paste ❤️💖💕: List, Meanings, Shortcuts
 Love Is Blind Jessica: Stories of Batten, Vestal & Barrett
 Diary of a Wimpy Kid Movie: Disney+ Order & Guide
 Adults Only All Inclusive Resorts: Top Europe & Caribbean Picks
 Gas Prices Near Me – Cheapest Stations Birmingham Hoover
 Nose Piercing Near Me: Ireland Studios, Costs & Safety Tips
